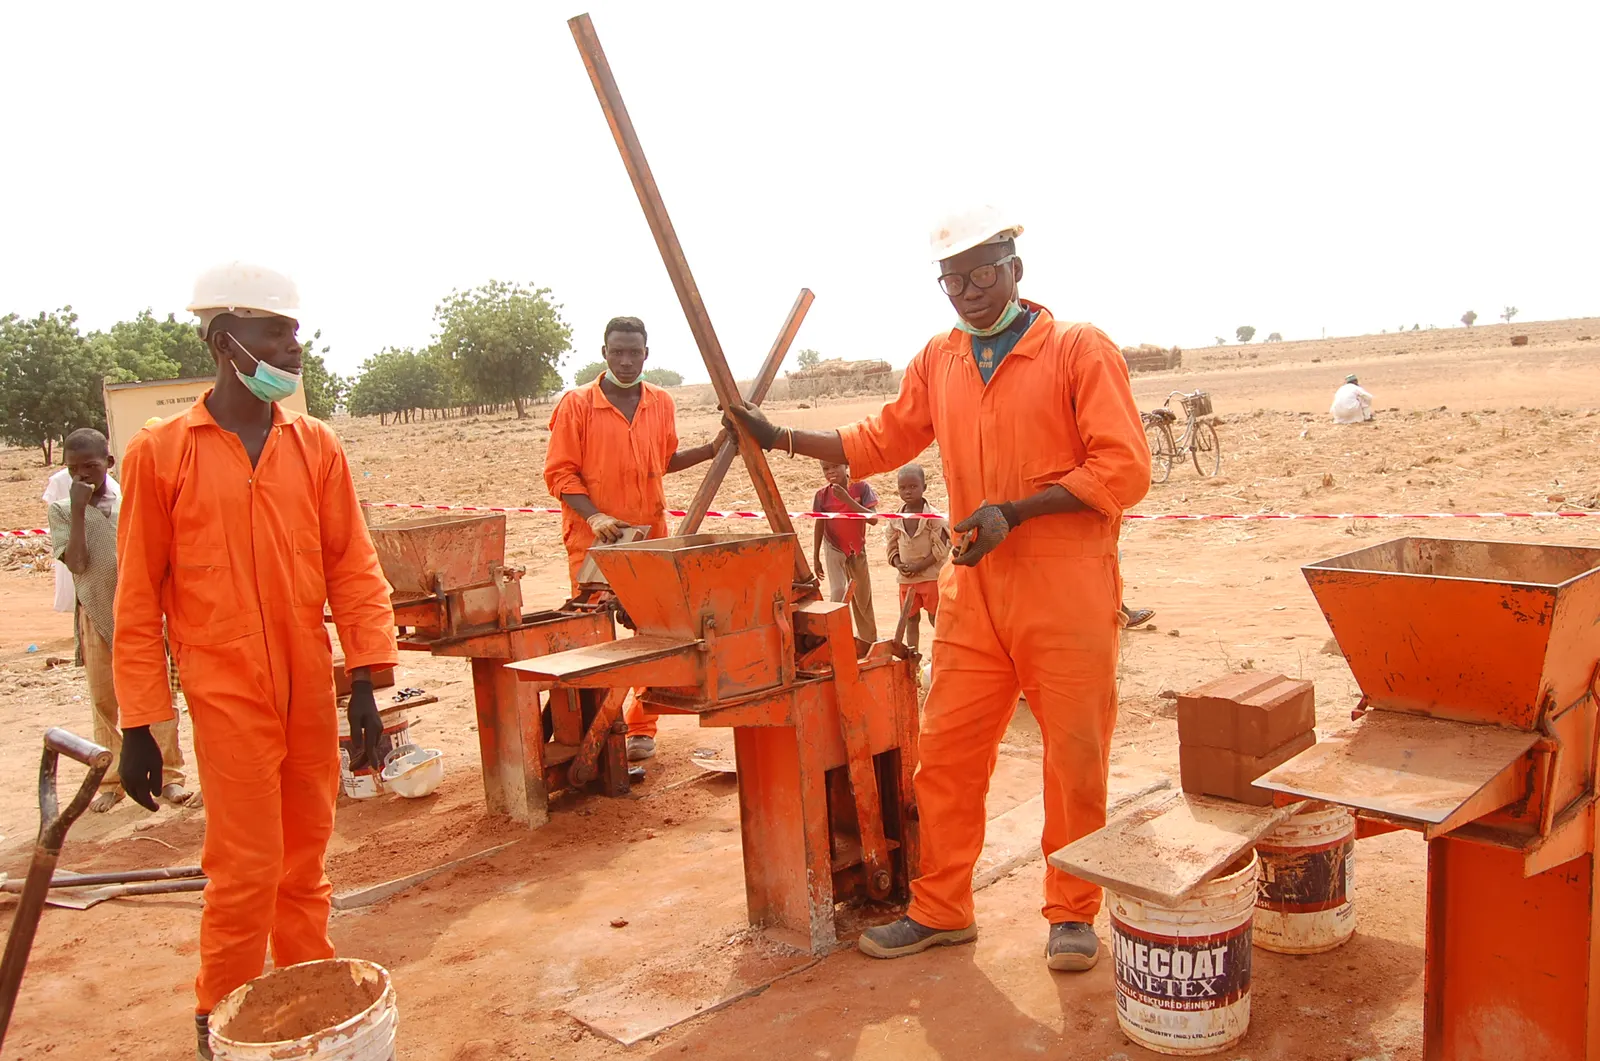
Interlocking earth bricks are pressed from soil, stabilised with a little cement and shaped so that each block locks into the next. Because they fit together, a wall needs much less mortar than conventional blockwork. That is the whole appeal, and it is also why the method looks deceptively simple. A wall built with poorly chosen soil, a thin dose of cement and no curing can fail just as surely as a badly made sandcrete wall.
This guide walks through the steps in the order you would meet them on site. It draws on published manuals and papers from UN-Habitat, UNHCR, the Auroville Earth Institute, a Hydraform review paper and Nigerian field studies, and every step names where its advice comes from. Where those sources disagree, which is often, we show both views instead of choosing one for you. We make Compressed Earth Bricks at Ipile Earth Synergy, so we also say where something is our practice and not a published rule.
What are the steps to build with interlocking earth bricks?
Test the soil, fix the cement dose, press the blocks, cure them, build a conventional foundation with a damp-proof course, lay the first course in mortar, stack the rest, add lintels and a ring beam, run services through conduit blocks, fit a roof with generous overhangs, then finish the walls.
- 1Test the soil.
- 2Fix the cement dose with trial blocks.
- 3Press the blocks at the right moisture.
- 4Cure and stack the blocks.
- 5Build the foundation, plinth and damp-proof course.
- 6Lay the first course in mortar.
- 7Stack the remaining courses.
- 8Form openings, lintels and the ring beam.
- 9Run the services.
- 10Fit the roof and protect the walls from water.
- 11Finish the walls.
Step 1: How do you know if your soil is suitable?
UNHCR says suitable soil has a clay content of 15–35%, and soil tests are mandatory. Remove the topsoil, because organic soil is not suitable, and avoid anything above about 40% clay. In Nigeria laterite is the usual choice. Run simple field tests first, then confirm with trial blocks.
Soil is the raw material, so this step decides most of what follows. UN-Habitat advises removing the topsoil to reach the sub-soil, and describes murram or laterite from sub-levels as suitable for cement-stabilised blocks. The Auroville Earth Institute lists the limits: soils with more than 40% clay are not suitable, and topsoil or organic soil should not be used. High-clay soil cracks as it dries, and very sandy soil does not bind.
The simple field tests are cheap. Smell a damp sample: a musty or rotten smell means humus, and humus is unsuitable. Rub it between your fingers to judge how sandy or silty it feels. Do a jar test: fill a clear bottle a quarter to a third with soil, add water, shake it hard, and leave it. Coarse sand settles within seconds and silt and clay settle slowly, so you can read the layers after a day. These tests tell you roughly what you have. They do not replace a lab test or, better, a set of trial blocks pressed and crushed before you commit.
Step 2: How much cement should go in the blocks?
Published sources range from about 3% to 10%. Auroville gives a 5% average with a 3% minimum and an economic maximum of 8–10%, and Hydraform quotes about 10%. In one Nigerian study, 5% cement gave 1.63 N/mm², below the 2 N/mm² NBRRI threshold. Test your own soil to set the dose.
| Source | Cement share | Note |
|---|---|---|
| Auroville Earth Institute, code of practice | Minimum 3%, average 5%, economic maximum 8–10% | By weight. Auroville states no technical maximum. |
| Hydraform | About 10%, or a 1:10 cement-to-soil ratio | Manufacturer. The basis of the ratio is not stated, so do not assume 1:10 means 10%. |
| Raheem, Bello and Makinde, Ogbomoso, 2010 | 5% gave 1.63 N/mm². 10% gave 2.60. 25% gave 3.12 | 28-day dry strength of laterite interlocking blocks. |
Sources disagree because they cover different soils, machines and test methods. Treat these as a starting range to test, not a recipe.
More cement means stronger blocks and higher cost, and the gain flattens as the dose rises. The lesson from the Nigerian study is that the cheapest dose may not be adequate: at 5% the blocks fell short of the strength the authors cite from NBRRI, and at 10% they passed. A responsible producer presses trial blocks at two or three doses, cures them, soaks some, crushes them and picks the lowest dose that passes. Ask any block supplier for exactly those results.
Step 3: How do you press good blocks?
Mix soil, cement and water evenly, then check the moisture with the drop test. Auroville says a pressed ball dropped from one metre should break into three or four pieces. If it bursts into dust the mix is too dry, and if it barely breaks it is too wet. Press with consistent force every time.
Dry-mix the soil and cement first, then add water until the mix holds together when squeezed in your fist but does not run between your fingers. The drop test checks it: ball up some mix, drop it from about a metre onto a hard surface, and look at the result. Three or four pieces is right. If it shatters into powder, add water. If it flattens or barely cracks, it is too wet.
Block height also matters. Auroville points out that the accuracy of the block height from most presses is not high enough to lay blocks without any mortar at all, and that height varies with moisture. That is one reason the first course is bedded in mortar, and why quality-conscious producers check block dimensions through the day. For more on the product itself, see our guide to Compressed Earth Bricks.
Step 4: How long must the blocks cure before use?
Keep fresh blocks covered and damp for at least seven days, watering morning and evening, and three times a day in hot weather. Full strength takes about 28 days. Sources range from 14 days to four weeks. Blocks used before they are cured and dry are likely to crack.
| Source | Advice |
|---|---|
| UN-Habitat Urban Energy technical note | Start on day two. Water morning and evening for at least seven days, three times a day in hot weather. Full curing takes 28 days. Stack in layers of five and cover. |
| Auroville Earth Institute | Cover with plastic for two days so that cement blocks do not dry at all. Cure about four weeks, then dry. |
| Hydraform review paper, 2023 | Sprinkle at least twice a day for 14 to 21 days. |
A simple quality check from UN-Habitat: put a fully cured block in a bucket of water for a day and see whether it holds together.
The sources differ on the details, but they agree on the principle: cement needs moisture to gain strength, so fresh blocks must not dry out. Stack them in short piles in shade, cover them, and water them. That is also why production has to start well before building does. A house needs thousands of blocks, so plan the pressing weeks ahead of the walls.
Step 5: What foundation does an earth brick house need?
A conventional strip footing, designed by an engineer. The Hydraform review paper describes foundation walls built in higher-strength blocks laid in a mortar bed, or conventional masonry, with courses laid in mortar up to floor level. Add a raised plinth and a damp-proof course. Foundation depth must be set for your soil.
Earth walls are strong in compression and weak against water, so the foundation detail does most of the protecting. A review of the Hydraform system in the American Journal of Civil Engineering and Architecture describes a dry-stacked building built on a conventional strip footing, with foundation walls in higher-strength blocks laid in mortar and everything up to floor level in mortar, then dry stacking above. We could not find a published foundation depth for interlocking blocks. That depends on your soil and loads, so it is an engineer’s decision.
Then comes the plinth. The Auroville code asks for a plinth at least 25 centimetres high and a damp-proof course described as essential to stop capillary action, which is water climbing the wall from the ground. Its own documents differ on the thickness of that course, from one to two and a half centimetres of waterproofed cement mortar, so follow your engineer’s drawing. The point is the same in every source: keep ground moisture out of the earth blocks.
Step 6: Why is the first course laid in mortar?
The first course sets the line and level for every course above it. Hydraform training lays the first course, corners, T-junctions and the ring beam in mortar, then dry stacks the rest. Mortar compensates for any unevenness in the slab, and corner blocks need cement slurry for stability while the walls go up.
Get this step wrong and every following course carries the error. Spread a mortar bed, set the corner blocks first, and check them with a spirit level and a string line. The Hydraform review paper recommends starting with a half block to stagger the joints, and notes that corner blocks need their ridge shaved so that they seat properly. Check level in both directions and check that corners are square before you let the mortar set. The damp-proof course sits just below this course.
Step 7: Should the rest of the wall be dry stacked or mortared?
Sources disagree. Hydraform and UN-Habitat promote dry stacking above the first course. The Auroville code calls dry-stacked interlocking masonry not advisable, and uses a five millimetre mortar joint. Several sources mix the two. Follow your engineer’s detail, and note that gaps between blocks can let water in.
| Source | Position |
|---|---|
| Hydraform training course outline, 2026 | Dry stack with mortar only on the first course, corners, junctions and the ring beam. |
| Hydraform review paper, 2023 | Courses are laid in mortar up to floor level and dry stacked above, up to the lintel band. |
| Auroville Earth Institute code, 2015 | Dry-stacked interlocking masonry is not advisable because nothing binds the courses together. Lay interlocking blocks with a 0.5 centimetre mortar joint. |
| EMI Tech article, 2017 | On one campus, buildings designed as dry-stacked earth blocks without mortar or reinforcement showed distress. Lintels were not continuous and stabilisation was not properly done in block production. |
The Auroville code is about its own block type. Hydraform’s system is designed for dry stacking. Neither is wrong for its own product, which is why the right choice depends on the block you are using.
This is the part of the method where honest sources disagree most, and where you should be wary of anyone who says there is only one way. Dry stacking saves mortar and time. It also depends on blocks of accurate height, correct stabilisation and careful laying, because there is no mortar to hide errors. A Witwatersrand thesis on dry-stack masonry found that a plain dry-stack test house failed at 0.3 g in shaking-table tests against 0.6 g for conventional masonry, and proposes ways to strengthen the system’s lateral capacity. Whichever you choose, lay courses in a running bond, keep the walls plumb, and do not leave tall free-standing walls unbraced.
The Hydraform review paper adds a practical warning: do not raise a wall beyond lintel level unless a lintel band is in place or the wall is loaded, because a dry-stacked wall can topple in high wind. Build up to lintel height, form the band, and only then continue.
Step 8: How do you form openings, lintels and the ring beam?
Use lintels over every opening and tie the top of the wall together with a ring beam. The Hydraform review describes mortared top courses or a reinforced concrete ring beam, and the roof should be tied to it against uplift. Conduit blocks can carry horizontal reinforcement. An engineer must specify the sizes.
A ring beam is a continuous horizontal band at the top of the walls that ties them together and spreads the roof load. The Hydraform review says the top three courses can be held together with mortar to form one, or you can cast a reinforced concrete ring beam, and the roof must also be tied to the ring beam to resist uplift in wind, which an engineer specifies. Hydraform’s conduit blocks have a horizontal channel that can take reinforcement for a lintel or tie beam, and its largest conduit block is described as recommended for seismic regions, as per the engineer’s specification.
Two lessons come from failures. The EMI Tech investigation of a campus built in earth blocks found that many lintels were not continuous, and that roof beams bearing directly on wall corners concentrated loads and caused distress. So make lintels continuous with the ring beam, and spread roof loads along the beam instead of landing them on a corner. The sizes of bars and openings in the Auroville code are for its own hollow block system, so do not copy them onto other blocks.
Step 9: How do you run electrical and plumbing services?
Use conduit blocks, which have a horizontal cavity for cables and pipes, and plan the routes before you build. Avoid chasing finished walls where you can, because drilling and hammering can dislodge blocks until the wall is loaded from above.
Interlocking blocks are laid quickly, so services must be planned before the wall goes up, not after. The Hydraform conduit block gives a horizontal cavity for cables and piping, and the interlock grooves can carry vertical runs. If a chase must be cut in a finished wall, the review paper warns that hammering or drilling can dislodge blocks until the wall has the roof load on it. Fix your socket and pipe positions on the drawings and mark them on the blocks as you build.
Step 10: How do you protect earth walls from water?
Keep water off and out of the walls. Use a raised plinth of at least 25 centimetres, a damp-proof course and generous roof overhangs: Auroville’s code says 50 centimetres. Fit gutters, drain water away from the foundations, and repair leaks quickly, because moisture aggravated damage on one earth-brick campus.
Earth walls tolerate rain well enough when they are built right and fail when water collects at their base or soaks them over time. Auroville sums it up as a good pair of boots, the plinth, and a good hat, the roof overhang. Its documents give the overhang width as 25 centimetres at minimum or better 50, and show both figures, so choose according to your roof height and exposure. UN-Habitat adds that proper drainage and overhangs protect the walls.
The EMI Tech investigator called deterioration the most prolific form of distress on the campus studied, and named moisture from broken drains, gutters and leaking water or sewer lines. So the maintenance advice is simple: keep gutters clear, fix leaks at once, and never let ground water pool against a wall. Roofs should also be tied down against uplift, as the ring beam step says.
Step 11: Do earth brick walls need plaster or paint?
Not always. UN-Habitat’s Uganda booklet says neat block finish and weather resistance remove the need to plaster the whole wall. In high-rainfall areas an external cement plaster may be needed, and gaps between blocks can let water in. Use breathable finishes: Auroville warns against bitumen and synthetic paints that trap moisture.
This is one of the main cost savings of the system. A sandcrete wall normally needs plaster on both faces. Interlocking blocks pressed to a consistent size can be left exposed inside and out, or given a light coat or a clear breathable sealer. The Hydraform review notes that where rainfall is heavy the outside may need cement plaster, and that any gap between blocks can become a route for water. The Auroville guidance is that any paint or plaster should allow the wall to breathe, so avoid bitumen and synthetic coatings.
How many blocks, how much cement and how long does a house take?
UNHCR’s technical note estimates 2,200 blocks for a typical small house, about 29 bags of cement and 20 cubic metres of soil. The manufacturer claims 1,300 blocks a day from one machine, but UNHCR reports field output closer to 500, so pressing alone takes about four and a half machine-days.
These are planning figures, not guarantees. UNHCR’s Geneva Technical Hub note on interlocking stabilised soil blocks gives 2,200 blocks for a typical house, one 50 kilogram bag of cement producing about 76 blocks, which comes to roughly 29 bags, and about 20 cubic metres of soil. It says the manufacturer’s stated production rate of 1,300 blocks per day on one M7 machine is closer to 500 in the field, which makes 4.4 machine-days for the house, with at least eight workers in the yard and a two-week training course for the crew. UN-Habitat’s 2009 note on Uganda gave a different yield, about 130 blocks from a bag of cement, and the difference comes down to cement share and block size. Hydraform’s own sheet claims up to 1,500 blocks per eight-hour day. Quote your own numbers from your own machine and mix.
Be wary of claims that earth-brick walls go up six times faster or use 75% less mortar. Those are manufacturer statements, and the sources reviewed show no independent measurement behind them. Our own company profile says a building is usually delivered within six weeks. That is our figure for our projects, not a guarantee for yours.
What are the most common mistakes?
Using unsuitable soil, too little cement, or blocks that were not cured. Laying dry-stacked walls with gaps, leaving lintels discontinuous, and neglecting drainage. A Nigerian study of the Hydraform system found poor on-site block quality, production delays on large jobs, and unskilled labour among its main problems.
- Wrong soil or too little cement. A block pressed from high-clay or organic soil, or stabilised too thinly, loses strength when wet.
- Skipping curing. Blocks used green crack, and strength is lost.
- Gaps in dry stacking. Water finds them. Fill and finish them correctly.
- Weak connections. Discontinuous lintels, roof beams landing on corners, and an untied roof were among the causes of distress in the EMI Tech study.
- Water at the base. Broken drains, missing gutters and no damp-proof course.
- Poor on-site quality control. A 2014 Nigerian study of the Hydraform system by Waziri, Kadai and Biu, in Civil and Environmental Research, listed poor on-site block quality, production delays on large jobs, higher rates charged for laying the blocks than for sandcrete, and unskilled labour as problems.
- Soil from far away. Transporting soil removes most of the economic advantage.
Every item on this list is a management problem, not a flaw in earth as a material. That is why a builder should control block production, test the soil and cement dose, cure the blocks, and have a registered engineer supervise the build. Our Project Manager is a COREN-registered civil engineer. See our work in our projects, including Navy housing at Kuje in Abuja, and compare the material with others in our guide to earth bricks, sandcrete and burnt bricks.
Sources
Figures in this guide come from the sources below, checked on 8 November 2026. Company figures are marked as Ipile's own.
- UNHCR Geneva Technical Hub: Use of interlocking stabilized soil blocks
UN agency technical note, 2023. Soil suitability, block quantities, output per machine, crew and training. Includes a Nigerian project in Adamawa.
- UN-Habitat: Interlocking Stabilised Soil Blocks, appropriate earth technologies in Uganda
UN agency case studies, 2009. Soil extraction, curing, drainage and finish.
- Surwade and Kamal: Hydraform interlocking block building system, American Journal of Civil Engineering and Architecture
Review paper, 2023. Foundation, first course, dry stacking, ring beam, services and finishes. A literature review of vendor material with an Indian context.
- Auroville Earth Institute: Production and use of compressed stabilised earth blocks, code of practice TM06
Institutional code of practice, revised 2015. Soil limits, cement share, drop test, curing, dry-stack position. Written for its own block types.
- Auroville Earth Institute: Design and masonry
Institutional guidance. Plinth, damp-proof course and roof overhang. Some figures differ from its code, and both are shown.
- Hydraform: Training academy
Manufacturer, 2026. Laying method and training content. A manufacturer’s description of its own system.
- Hydraform: M7 interlocking product specifications
Manufacturer spec sheet, 2022. Block sizes, conduit blocks and stated output.
- EMI Tech: Compressed earth blocks, by K. Forke
Practitioner article, 2017. Causes of distress on one earth-block campus.
- Waziri, Kadai and Biu: Eccentric problems of the Hydraform building system, Civil and Environmental Research
Peer-reviewed paper, 2014. Nigerian field problems.
- Raheem, Bello and Makinde: Comparative study of cement and lime stabilized lateritic interlocking blocks
Peer-reviewed, 2010. Strength of laterite interlocking blocks at 5–25% cement.
- University of the Witwatersrand: Stability of dry-stack masonry
Doctoral thesis, 2005. Shaking-table tests of Hydraform dry-stack houses.
Spotted something out of date? Tell us and we will update this guide.